Monday, May 3, 2010

Secretary Revealed

I have almost completed my secretary and this is the big reveal! Not if you have been following my Facebook, my step by step photos have been posted up for all to see!

I was inspired by Eddie Ross's secretary makeover here. I really liked how he put mirrors on his secretary but I thought that since this was my first project, I wanted to keep the costs as low as possible. (Ya gotta check out his blog, he has great ideas!)

I was also inspired by Kate from Centsational Girl. I have about 50 blogs that I follow everyday but I don't always have the time to read all of them. However, I always, always make time to read Kate's blog and never skip an entry. I started following her blog when I was still living in Singapore and feeling so envious of all the lovely cheap finds from thrift stores. She has so many great tutorials on her website, and I referred to her site repeatedly during my attempt to paint this secretary.


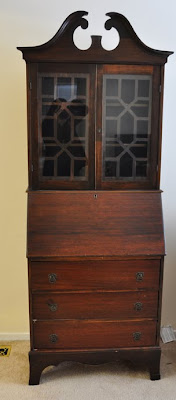
This is the "before" shot. This is what it looks like today. Click on the photo to see the larger shot.


I had to change the hardware, although some of it was quite difficult to replace, like the lock (it is without a lock at this stage because the one I bought was about 1 to 2 mm off in measurement and the door would not shut. Grr! That lock cost me US$8! I still have yet to put back the desk lid because I banged something against it and put a dent in the paint.  It is now drying, after a bit of sanding and repainting. 

Here is  how I did it.

First, I sanded the whole secretary. Before that, I removed all the hardware, took all the pieces apart. For the harder to reach places, I did the best I could or left it.


Repairing holes and wood gluing back the rickety bits.
Next, I primed the wood with Zinsser Oil Based Primer. At first I thought of using water based primer but heard the results of oil based primer was far superior. However, after I had started with it, I regretted it because it was difficult to clean the primer. Ya just can't wash it off with water - duh! I had to buy paint thinner and eventually brush cleaner but neither of them worked. I had to throw out my very good brushes and rollers after a few coats. Ouch!


Then the fun part began - painting! I used Rustoleum's Heirloom White, which is an off white colour.

 
As for the inside of the shelf, I painted it a Tiffany blue colour. For the life of me, I don't know what the colour is called, I looked at the can and could only come up with Continental Hotel Abby and I am sure that isn't it!

I changed the hardware, purchased from Lee Valley in Canada. They have the best hardware and woodworking stuff, all presented in a beautiful catalog.

Very happy with the way this turned out, not too bad for a first project in terms of difficulty. If I had to do it all over again, I would probably have covered up the keyhole, and placed a handle or pull on it as antique locks probably don't match up with today's.
Wednesday, April 28, 2010

Bosch Pocket Driver Giveaway

I hit a snag with my secretary makeover because I was trying to hammer in some nails to put the parts all back together.  The angle of some of these nails make it difficult for me to get the nails all the way in. So I thought that if I had screws instead, it might be better and what I would like is to get a driver to help me drill holes into the wood, it would make things easier. 

I went to Home Depot on Friday with Matt and I tell you, we both stood there, not knowing what to get. I was overwhelmed with the choices. However, one thing was obvious, most of the drivers were pretty heavy and the one I liked was cordless and small, about 1.8 pounds. However, it was a lot more than I had planned on spending because, well, I am not a serious carpenter or a DIYer. This is my first project on a $100 secretary and I found it hard to justify spending $79 on a driver. No doubt, I will get plenty of use out of it but I just don't have that in my budget right now.

So today, I found out that A Concord Carpenter is having this great giveaway! It sounds like an absolute dream power tool. Robert does a video review of the product too, which is very handy (no pun intended!) for people like me, who need to see how some of these things work.

Click on the link to enter the giveaway! Although, for selfish reasons, I hope that I win it!

Wednesday, April 21, 2010

More Furniture Finds

I saw this photo on Lonny magazine and fell in love with these beds for the kids.

So when I saw these maple beds on craiglist, I just had this light come on in my head. We paid $50 for each of them.

Can you see where I am heading with these beds? They are solid as. I love that man's wingback chairs in the background, I am on the lookout for a pair too! Now that we have a new home to move into, I can start planning what colours to paint our furniture!

Wednesday, March 24, 2010

Dorothy Draper Find

Sorry for not blogging in here for a while. I have been very busy house hunting and we have been quite selective about what we want. Our reasoning is that we have lived in rental homes for so long now that we feel we deserve to live in a place that we consider "perfect"!  However, as we continue our search, I wonder if there is such a thing as a perfect home within a budget?

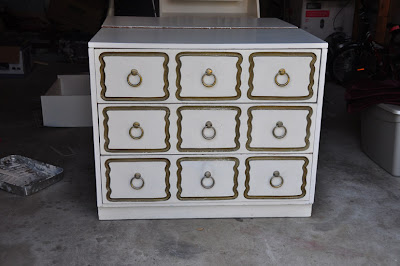
Anyway, last Friday, Apartment Therapy featured a pair of Dorothy Draper chest of drawers, for $140. As you may be aware, I have been drooling over these for a while but I can't justify buying them for thousands of dollars.

I called the lady and to my disappointment, she said a gentleman was coming to see it - she lived in Virginia and there was no way we could go see it straight away as it was a weekday, and I was not confident about driving. (My dear hubby takes me to this thrift finds, what a honey!)

So, I was resigned to letting it go but for some reason, the next day, when Matt had a day off work, I called her again to see if they had been sold. She said no!!! It was meant to be mine! I had the same feeling when I spotted the lovely Union Jack dresser - that it had my name written on it.

They both managed to fit into our car and here they are, sitting in my garage, waiting for us to move into our new home. I want to see what sort of furniture I will buy as we move so I haven't decided what colour to paint it yet. In the meantime, aren't they just divine??? There are two of them, the other one is behind it. In the background, you can see I am working on the secretary. It is done but I need to put a glossy coat on it and I have to do some research on how to make furniture look glossy.

Monday, March 1, 2010

Secretary Find

I spotted a secretary for $100 on Craiglist and I was thrilled because these things cost $600-$700 in Craiglist usually. As we are quite new to the USA, we have not really seen these types of desks before so I was really fascinated by the lines and concept of it.
It had some minor imperfections like hinges not working, sides falling off and cracks. The lock was missing a key but I knew I could replace it on Lee Harvey, Canada's best hardware shop.

 So I got to work, removing all the shelves, doors and drawer pulls. Had to buy new ones to modernize the look. I chose a cream white colour but halfway through sanding, I realised that there was a tricky bit that I could not reach with a brush so I had to buy a spray paint. They only come in one colour, not the one I had ordered mixed for me. It was a heirloom white, just slightly off white.


This is the part I am having a tough time with. I cannot remove the little shelves - if I do, I would not know how to put them back together. I sanded as much as I could but still it was not very good. After I spray painted it with primer, I noticed there were streaks of primer dripping down due to gravity, leaving it to dry with these streaks. I sanded it but without success as my fingers cannot reach those narrow areas. I hope that it is not noticeable to others and my only consolation is that it will remain closed so no one will see it that much.

More pictures to come!

Tuesday, January 26, 2010

Craiglist and Thrift Store Finds

I love thrift stores here. I know some of my friends and family would shun second hand goods but I love the idea of recycling something, and best of all not paying the full price for it.

I go on Craiglist once a week to check out mainly furniture - I have been so inspired by a lady I met in Virginia who sold us this beautiful dresser which she hand painted herself. She has an inspiring blog called Painted Furniture. I used to think, "I don't have the space, I need the room, etc. before I start working on any of my bigger projects." Well, this lady lives in a smaller place than mine and that did not stop her! If she can do it, why can't I? I have no excuse not to get going! This is what we bought from her and it now sits in James' room. We love how it adds a pop into his room and he gets many comments when people see it. However, it will be there temporarily until we move into a house of our own then we can place it in a more prominent spot.


So anyway, we found this amazing bookstore, Friends of the Library, where there are tons of books donated by the library and general public. In Singapore, we used to wait for the event once every two years to be held at an expo center. Then, we would have to fight with the masses of people, and I mean masses (37,000 people to be exact over 2 days) for books. I am glad we have store here without needing to queue for hours and we get to select our books slowly and with some dignity! :)

So this week, we found these classic books for $3 each.

They are all hardcover and written by Munro Leaf. These are old, old books and have been reprinted. They have the most darling illustrations. Even though James will probably not read them as it is targeted at younger children, Cameron would be able to read them. They are on my keepers list of books but never bought them because they were so expensive to buy in Singapore, like $25 to $30 each due to postage from the USA. And to find four from Munro Leaf in a thrift store is such a bonus!

Tuesday, January 5, 2010

Christmas Redwork Quilt

Happy new year! Can you believe that I finally finished this quilt yesterday? That means that I will be ready with all these Christmas decorations for this years's Christmas!

It didn't turn out as well as I would have hoped because I used a wired ribbon, which I cut away leaving a plastic like ribbon to work with for the gold border, and it did not sit flat. I bought it because I could not find a ribbon which was 1 inch in width. They had 1.25 inches and 0.75 inches which was strange. Then I spied a roll of Christmas gold ribbon for wrapping presents and I thought it would work. It was a good but time consuming experiment, because next time, I will use 100% cotton fabrics.

The other thing I learnt while making the redwork was that I have to be so careful to tie up loose ends because they show right through the white muslin from the back! At first I thought my coloured thread was bleeding but it was due to this reason.


See how unevenly it is sitting? Nevermind, I will know for the next time!