Wednesday, December 22, 2010

I Love Home Goods

Home Goods is a must visit if you ever come to the USA. It is a place for home decoration goods - ranging from things in the kitchen, furniture to the garden - anything you could imagine that fits into the home. What is so special about it is that high end shops discard their excess stock and sell it to HG and they sell it to us at deeply discounted prices. There are lots of goodies from Ralph Lauren in sheets, pillows, Tommy Hilfiger, high end stuff at 60% off.

The thing about Home Goods is once you see something you like, buy it immediately because if you let it go, chances are you will never see it again. There is always a 30 day refund if you change your mind but at least, it gives you time to think about your purchase.

I am putting the boys' room together and found something that I think will go well in their room. The letter J. This is made of solid wood and is very heavy.  It needs a paint job and a makeover to fit what I have in mind for their room. Now I just need a C.  It is so fun finding pieces that will all go into putting a room together!


The other thing I bought was this fun kitchen clock. We do not have a clock in the house because clocks are such boring things. The ones I like are usually too expensive so when I saw this clock, I knew I had to have it. I am thinking of painting the red utensils stainless steel colour to tone it down a little but would need to find if I can find a "steel" colour. It cost me $19.00


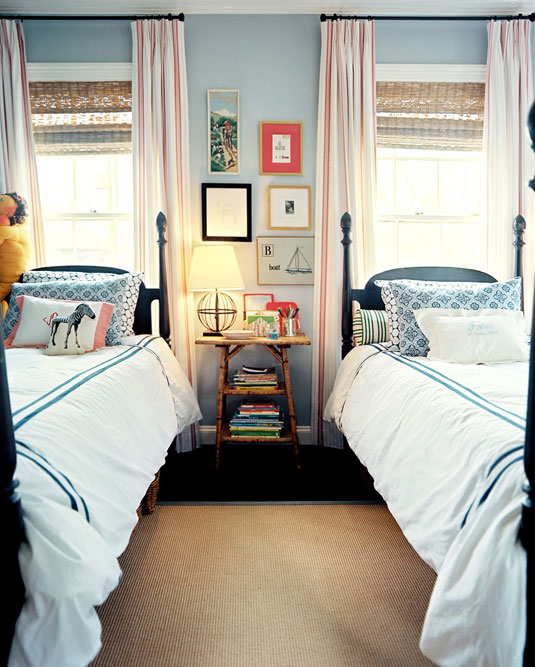
There is a delightful story of a mother who decorated her daughters room with a budget of $250. This story was featured on the very popular design blog which I read daily, Apartment Therapy.  What I loved about their room were the two sunburst mirrors and the lucite chair.


The mirrors came from Home Goods for $25 each and others asked where they could buy it - the closest match they could find was $500 each! Her story is a real inspiration that you can make a room so gorgeous and not have to break the bank.

Saturday, December 18, 2010

Gingerbread Christmas Ornament

I have not been creating very much these days, as I have so many projects on at the same time that I don't get to complete anything. Ever been through that feeling?

However, there was a quick project that I was able to do and that was Elsie Marley' very cute half eaten gingerbread man. You can see her tutorial here.

I made a few of these to give them to friends from my care group. I had the lighter colour felt and worked with that initially and later went to Joann Fabrics to get the darker browns. I am not sure which one I prefer. My son, Cameron likes the darker one because it reminds him of chocolate!


It was a very fun project to complete and I think they are hilarious! Go to Elsie Marley's blog to check out her other cool tutorials!

Sunday, December 12, 2010

Antique Quilt

During one of Cameron's school field trips, we went to a manor where a rich family used to reside. The house was built in the 1700s and they were personal friends with George Washington.

Everything in the house was retained to be the same as it was in the 1700s and we got to eat and watch how food was cooked over a fireplace.

We also got to see a real log cabin. It reminded me very much of Little House On The Prairie.

However, the one thing that caught my eye was a quilt hanging on the wall of the house.

Sorry for the blurry pictures, I did not have my camera with me that day so I had to settle for my iphone.
Isn't it lovely? I love old quilts and I wonder about the ladies who made them.

Monday, December 6, 2010

James' Bed

I have been working on the boys' room and want to give them one that is not too "theme related" and something that would only last until their teen years.  What I mean by that is that if I had done it like train room or shark room, by the time they hit their teens, it will not be very cool any more. I was looking for something more grown up.

I saw this bed in the Lonny Magazine and was inspired.


I saw  these beds on Craiglist advertised for $100 each, I managed to bargain them down to $75. It is solid, made of maple wood veneer but it is ripped up and has marks in several places. I thought about restoring it to its original state but that is beyond me because some of the surfaces has gone below the veneer.


So I sanded them down and primed them over the weekend. However, when I went to paint them, I noticed the paint was wrinkling!!! I had to re-sand and repaint 3 times and thought it was because of the cold that the paint was not sticking. After all, the can did say, "Spray when temperatures are 50 deg F."  It was 32 F.

Then, I took the beds inside, lined the floor with a drop sheet and in front of the fireplace, spray painted the bed again. Did not help at all.


This is what the bed looks like, primed with gray primer. I actually like the colour of the primer more than the actual colour itself!

Now, I am beginning to wonder if it is due to the fact that I did not sand the whole bed. I could only sand the flat parts of the bed but found it hard to sand the spindle. I have to sand off the paint and reapply primer again to the bed. I also used latex based primer, which is a change from the oil based primer I used to work with. Oil based primer is an excellent primer for working with wood, you don't even have to sand the furniture to get the paint to stick on it but it is a pain to clean and very toxic.

Wow, this is hard work. I don't like working in the winter. The garage is so cold and what I really need is a well ventilated, heated work space.  Hint for Christmas, Matt!

Building A Desk

I go to Ana White's blog and she is a real inspiration to about a million women. She has inspired me to buy tools and make a desk for my study because at the moment, it is a right mess. We are too cheap to buy a desk so Matt suggested I make one!

We ordered an air compressor and it came with a brad nailer/stapler gun. It was a Black Friday deal, reduced from $199 to $59, free shipping to our house.


So when it got here, I started working. Matt helped with the instructions on how to run the machine. He tried to give it a go but he ended up putting holes in the wrong spots and eventually went inside to help Cameron with the cooking!

It was a lot easier than expected but as I went along, I learnt many things, that we use drywall screws to put MDF wood together, as compared to regular nails for plywood. Ana is a great teacher, she gives such details that you can follow her instructions easily. 

Working with wood reminds me of quilting. It has the same sort of precision, measurement, mathematics. Just different tools. When I mentioned this to a group of men in the woodworking class I did last year, they did not seem very impressed and my comment was received with grunts.


It was bloody freezing in the garage that day, below 0 degrees. I tried working with gloves but I found I could not pick up screws with them on, so I took them off. My fingers were numb at the end of it! But oh, it was so rewarding to see the little drawer base completed. I just have to sand it and finish it.The patches of cream is where Matt accidentally drilled holes into and realised they were in the wrong spot. No harm done, everything is fixable with wood filler, a sanding and a coat of paint.

Monday, November 22, 2010

Going To Make These

I love this Gingerbread Man to hang on the Christmas tree or even as gifts for friends. It is so hilarious!


Friday, October 29, 2010

My Chair

I have been slow in crafting for a long time. Since moving here, I find that I have less time to myself to do any crafting because I am spending more time cooking and cleaning, and driving my kids to and from school.

However, one indulgence that I have is re-upholstery classes and I never imagined that it would be so much physical work! To read more about the chair see here.

From this wonderful thrift store find, I am converting it to this:

It is still a work in progress but it has taken such a long time. I cannot count the times I have stabbed myself, stapled gun my fingers and tried not to bleed over my chair.

Here are some in between photos - I don't know if I can remember all of the steps but I hope to tackle another chair soon.  Well, as soon as I finish painting my walls, repaint some of my furniture and so on and so forth.  Think I will ever do another chair? I hope so!

I did not know that people used horse hair or hogs hair to stuff a chair. Apparently the really good quality chairs use horse hair whereas some other places like Asia use coconut husk. I just re-used the horse hair that was already in my chair.  I was a tiny bit grossed out by handling old horse hair. It just felt very coarse and reminded me of pubic hair.


Then cotton is placed on top of the horse hair before placing and stapling the fabric onto the chair.


Here is a picture that James took of me using my heavy duty nail gun in the family room.

I hope to finish this chair this weekend!

Tuesday, October 19, 2010

Pelmets

Through the decorator I went with, I ordered some fabric to go over the pelmets in my family room. At that time she warned me that the fabric was expensive and I thought, "How expensive can they be? $35 per yard?" I was a bit embarrassed to keep asking how much everything was and I like to thrift because I know that there are cheaper alternatives out there. But you don't hire a decorator and turn cheap on her, like my friend Revathi mentioned. She had a point.

Turns out, this fabric is US$115 per yard. I nearly fainted when I saw the invoice but as most of our stuff was selected based on that fabric, there was no turning back. Luckily I only needed 2 yards. It is fabric by Schumacher and it was printed in Thailand! All good things come from Thailand, like Jim Thompson. I love it though.


I thought do the valences myself since there were already valences in the house with a very country-ish fabric on them that suited the previous owner's furniture.


Ignore the mirror sitting on the floor, I still have to figure out how to hang that because it is darn heavy and the last thing I want is for it to come crashing down in the middle of the night.


This is what it was like before. I tore the trimming out and using the nail gun, I nailed the new fabric over it. Easy peasy!


Heart attack moment: I cut the first piece and realized that I had the WRONG measurements! OUCH OUCH OUCH! That was a $76 mistake. Hmm...I hope I can re-use the fabric for cushions. On second thoughts, I hope I have enough fabric for the other valence!

Sunday, October 3, 2010

Repainting My Walls

We hired a decorator from out of state, (as she was the only one whom I knew) and she came to our house and gave us some ideas on how to make our place more relevant to us and one of the things she suggested was to paint the breakfast nook a black and white stripe to make it stand out.

So I got myself some paint and there are soooo many types of paint to choose from. I went with a satin sheen and realised too late that it is probably not very good if the walls are uneven. You can see almost every bump on the wall!

Anyway, I cannot be bothered repainting the whole wall. I just hope that it is not too noticeable when people come to the house.

So this are the before and after pictures. Please note that this is still a work in progress because the lines bled into the tape so I have to do a re-touching up!

Okay, this is not a very glam shot of me but let us focus on the wall eh? This is what the wall looks like after I primed it.


 After painting it white, I drew lines across, using a leveller and a ruler.


Then I taped it with painter's tape. I was told to use the Frog tape, which is very good for painting but I thought, "All tapes are the same!" What a mistake I made!

Here, I painted the black on the white.

After two coats of paint, I removed the tape and ta-daa! I am pleased with the effect. However, there is some bleeding and I will need to go back with a fine brush to fix it! Bah!

Next, I got rid of that hideous fan and repainted the wall adjacent to it because it is in some brownish colour.  Sorry about the mess, I am in the midst of painting the other wall.


What do you think?

Saturday, June 19, 2010

Thrift Store Finds

We all went down to the thrift store and found some real goodies. I found these beauties for $4 each for the tennis racquets and $2.50 for the badminton racquets.  They are the Wilsons brand and surprisingly light. I have had a game of badminton with Cameron already. They remember the countless times Sarmi, our helper, played with them.


I was inspired by this picture to make a project for the boys' room.

I wish I could remember the source of this picture to give it due credit. 
Matt also found a game of Scattergories, brand new, the cards were all in their original packaging, unopened for $4! I also found some glass candle holders, which I intend to make a cake stand out of them.

Monday, June 14, 2010

Reupholstery...A Long Journey

I have been attempting to re-upholster a chair I picked up from a thrift store for $30.  Phew! Now I understand the work behind it, I can appreciate why people charge so much to reupholster furniture! It is darn difficult!

I have not been posting much here but it does not mean that I have not been crafting. On the contrary, I have been working on this chair.

First I took almost everything off, including the jute webbing you see here.


The chair is solidly and beautifully made, with tacks all over it. There was a stamp on it which said it was made in Italy.


I then used a citrus paint stripper which was less toxic to strip down the paint to its raw wood. Then I thought I'd lacquer it back to the same colour as it was all chipped before. I had wanted to sand it down, put some wood filler and fix up flaws.


Man, I had not expected it to be so difficult! I made the mistake of spray painting it outside so lots of pollen stuck on its surface. Matt also banged into it, which left a deep gash in the middle. So I had to strip it back down again but the second time around was so tough because I had not used a primer and it had gone into the wood. It was then when I saw the colour of the wood, I mean, really looked at it when I thought it would be a shame to cover all that lovely grain with dark lacquer.

I saw some chairs from various retailers which I went crazy for. Like this Restoration Hardware chair.


I emailed a blogger, Meranda, who paints furniture as a hobby and I had bought the Union Jack dresser from. She was ever so helpful! She pointed me to a type of finish called Swedish finish. Here are some pictures of furniture using this finish.
This image was taken from the Wisteria website - I love the furniture there.

Another example of Swedish finishing from Wisteria.

As I wanted the wood grain to show through, I did not prime it. It was really difficult to get the paint to stick. Based on Meranda's advice, I used this paint called Fossil by Rustoleum. They only sold the spray at my Home Depot, it would have been easier if I had a can. However, we work with what we have.

First, I sprayed on some paint, then using a rag, would wipe it away. Sometimes I would leave it in longer before wiping it off. However, I found that when I went to spray over it to give it another coat, the first layer of paint would come right off! This took me 6 hours, or perhaps even more! Eventually, I figured out that I had to use thinner to prevent the paint from drying too quickly and I could spread the paint more evenly on the wood.

This is what I ended up with. Meranda suggested getting some dark shoe wax to wipe over it to give it a different patina but I did not like it so I stuck to the original.

The whole process took me 2 weeks. The painting took a lot longer than I thought.


I did not get any fabric because I wanted to match it to the colour of the wood. There is a slight green tinge to the paint so I waited till it dried. I wanted a solid natural cotton colour but decided against it with the boys. One of them is bound to put marks on it. So I went with a pattern. The fabric is on order from Joann Fabrics. What a bargain! I went into the shop on Saturday and it was priced at $19.99 per yard. I needed 8 yards for the chair. Then the lady told me there was a 50% sale on Sunday. Right after church, I went back to the store and it was 60% off! What a happy day! I paid $7.99 per yard for the fabric.

Here is a swatch of it. This is not the true colour, there is a tinge of green on it which you cannot see here.
 Now, I am working on the webbing, and taking out all the springs and re-tying it. What a long process!


This is before I painted it, I removed the springs and had to retie them all to give it back the shape as it was already sagging.

More to come next time!