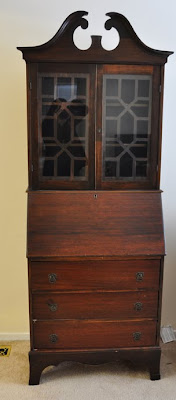
I have almost completed my secretary and this is the big reveal! Not if you have been following my Facebook, my step by step photos have been posted up for all to see!
I was inspired by Eddie Ross's secretary makeover here. I really liked how he put mirrors on his secretary but I thought that since this was my first project, I wanted to keep the costs as low as possible. (Ya gotta check out his blog, he has great ideas!)
I was also inspired by Kate from Centsational Girl. I have about 50 blogs that I follow everyday but I don't always have the time to read all of them. However, I always, always make time to read Kate's blog and never skip an entry. I started following her blog when I was still living in Singapore and feeling so envious of all the lovely cheap finds from thrift stores. She has so many great tutorials on her website, and I referred to her site repeatedly during my attempt to paint this secretary.
This is the "before" shot. This is what it looks like today. Click on the photo to see the larger shot.
I had to change the hardware, although some of it was quite difficult to replace, like the lock (it is without a lock at this stage because the one I bought was about 1 to 2 mm off in measurement and the door would not shut. Grr! That lock cost me US$8! I still have yet to put back the desk lid because I banged something against it and put a dent in the paint. It is now drying, after a bit of sanding and repainting.
Here is how I did it.
First, I sanded the whole secretary. Before that, I removed all the hardware, took all the pieces apart. For the harder to reach places, I did the best I could or left it.
Repairing holes and wood gluing back the rickety bits.
Next, I primed the wood with Zinsser Oil Based Primer. At first I thought of using water based primer but heard the results of oil based primer was far superior. However, after I had started with it, I regretted it because it was difficult to clean the primer. Ya just can't wash it off with water - duh! I had to buy paint thinner and eventually brush cleaner but neither of them worked. I had to throw out my very good brushes and rollers after a few coats. Ouch!
Then the fun part began - painting! I used Rustoleum's Heirloom White, which is an off white colour.
As for the inside of the shelf, I painted it a Tiffany blue colour. For the life of me, I don't know what the colour is called, I looked at the can and could only come up with Continental Hotel Abby and I am sure that isn't it!
I changed the hardware, purchased from Lee Valley in Canada. They have the best hardware and woodworking stuff, all presented in a beautiful catalog.
Very happy with the way this turned out, not too bad for a first project in terms of difficulty. If I had to do it all over again, I would probably have covered up the keyhole, and placed a handle or pull on it as antique locks probably don't match up with today's.


No comments:
Post a Comment