Thursday, December 29, 2011

Inspired By Pinterest: A Line Wool Skirt


 When I saw this skirt, I was struck by its simplicity. I am a reader of this lady's blog, Blame It On Fashion and I love her style. I went to her link to see if I could order it but she lives in Denmark and the company does not ship internationally. Plus it was a hefty price in Euro dollars. The image stayed in my mind and I decided I would make it.

Fast forward a few days later, I went to the thrift store, and picked up this size 14 skirt - in wool, all for $5.
 

Here is a picture of me modelling the skirt. :) It was intentional that I got a skirt this size because I make many mistakes and might need extra fabric!

So I started with a pattern - I used one of my old skirts which is a favourite of mine and traced a pattern around it.

Once the pattern was drawn, I unpicked the whole skirt, but I left the hem because that meant that I did not have to hem it later, thus saving me time. I reused every single piece of this skirt, from the lining to the zipper, even using the pockets to make my new pockets. I made several mistakes with the pockets and accidentally threw out one that I had completed.


I had not sewed a skirt for a long time (about 8 years) so this was a test of my memory, especially putting in the zip part. But I had a sense of satisfaction as I went along, remembering why I took lessons. Pity I stopped at drafting patterns for skirts before I left to live in the Middle East.

This is the end product. I took this photo this morning and it started snowing while I did it. The first snow for the winter, hurray!

Front view:

Back:


Me wearing it.


Methinks I made the waist a bit too high. That old skirt I used to draft a pattern with was too tight and it was only after I had sewn the skirt that I remembered that the old skirt used to sit on my hips. As it is now too tight (cough cough, I love my chocolate) I had to hitch it up to my natural waist line. Still, it's not too bad, considering that it was only $5 to make the whole skirt. 

The back view:

The chunky gold necklace is a Goodwill find for $5. 


 There was a lady who saw it first, held on to it but she was on the phone. She left it on the counter top, absent mindedly. I waited, and waited. Eventually she left the store, still talking on the phone so I swooped in and grabbed it before anyone else saw it.  And my shoes...oh sigh. Shoes are my nemesis. I love them and cannot resist them. They are the only things I buy new. I have seen these Zara pair on many bloggers and I love how it is so neutral yet contemporary. However, they are 4" in heel height yikes! I have never worn anything so high before because I had a major surgery on my bunions 20 years ago and they are never quite right.  I wear them and they hurt a little but beautiful shoes are meant to hurt, right? I heard Louboutins hurt like anything...


And just because I want to vary my poses...here's a goofy one. My sons, who are on a week's semester break thought I looked like a freak. I love them because kids are so honest.


Tuesday, December 20, 2011

Book Tote and Butterfly Art

We had an end of year party for our book club and I made some gifts for my girlfriends, some of who are beginning to be very dear friends. They have been my pillars of strength since I arrived in the USA. I made birthday gifts for two of them as I had not seen them for a while.

The first is a book bag I made for my friend Revathi. She is the organiser of our book club, always the initiative one and she holds the group together with her planning. We do not share common interests (I don't even read any of the books in the book club but I go there for the food and company) but since she loves books, I thought a bag to put her books in would be fun to make. I saw this idea on Martha Stewart and downloaded her transfer print. I did not follow her instructions as I thought her tote was too small. I just measured a canvas bag I already had.

I used drop canvas cloth (to protect the floors from messy paint jobs) from Home Depot - it is the most economical and the canvas is sturdy.  This is the finished product. I printed the transfer picture on to fabric using freezer paper. One could put snap buttons on the "Books" print and the user of the bag could remove it when the bag needed to be washed but I did not have any buttons at the time. You could also buy special chemicals called Bubble Jet Rinse that you pre-wash the fabric in so that when you print, the ink is permanent on the fabric. But as it was just for one project, I was unlikely to use them again and they are pricey.


I also made some butterfly stamp art - again an inspiration from Pinterest. This is the inspiration from Pinterest:

 This is my version. I was giving it to a friend who loves life with such a passion. She is a vet and she rescues animals and advertises to give them a home. I enjoy speaking with her because even after all her children are at college, she is still astounded at what life has to teach her I learn a lot from her. I wanted to give her something that had animals in it, yet had meaning in it.  See the butterfly in this photo? I took that in July 2011 before the Sept 11 tragedy occurred. The butterflies represent the lives lost but they are still with us in memories and thoughts. They are never forgotten.


I am really having fun with Pinterest because normally I don't venture very far off with my quilts and painting/furniture crafts. They both said that they liked my gifts. I am glad because I know that there are some who dislike getting hand made gifts, as I recently read in some famous online Design magazine. I always prefer hand made gifts because to me, it shows the effort and thought that went behind it, and hand made gifts are never, never "Oh, what will I do with this?" feeling. I have held on to all the hand made things given to me by my friends from 20 years ago, even hand made cards! What do you think, do you like getting hand made gifts or are they something to be put into the "re-gift to others" category?

Inspired By Pinterest: T-Shirt Scarf

I was away for a week because our whole family was sick with a stomach flu. And now that we are all well again, we lost connection with the internet after a storm. Happily, I was able to do lots of craft stuff as Christmas gifts for friends - stomach aches and lost internet connections did not stop me!

Remember the ruffle skirt? I was not really happy with the quality of sewing because of the white t-shirt underneath. Tip, choose a base colour that closely matches ruffles. I ended up ripping up the whole thing and turning it into a scarf. I will make another ruffle skirt the next time when the weather turns warmer.

 This scarf has been making the rounds on Pinterest so I wanted to have a go at it. You can find the tutorial here.

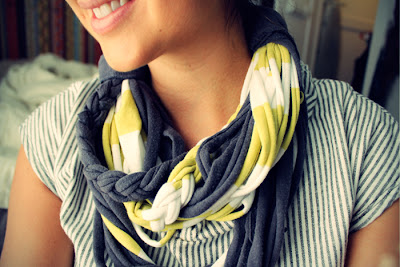
It is very important that you get a good quality t-shirt that is slightly thicker because as you pull the strips, they tend not to remain curled as the picture above. My t-shirts were from the thrift store and the interlock t-shirts are not as good as the others. They have already unravelled so I have to pull them taut again and again. This is what I ended up with. I had grey in it but it doesn't show up here in the photo. I enjoyed making the scarf but it is more of an accessory than to protect you from the cold.  The days have really dropped in temperature and on Sunday, it was hovering around 1 degree C all day.  However, I am thankful that it is warmer this winter than the previous two we have experienced here. Now we are just waiting for some snow!

Monday, December 5, 2011

Inspired By Pinterest: Ruffled Skirt


or here

I went to the thrift store where they had men's clothing at 50% off. I picked up about 10 XXL t-shirts at $0.75 to $1.50 and just out of curiousity, I stopped by at Joann's, which is a fabric and craft store - t-shirt materials is around $5.00 per yard.

I won't go into the details on how I made it because the other two websites have instructions. It looks really ugly when you first make it, even my husband was a little doubtful about the project. But when I put them on, he really liked them, which is saying a lot as he doesn't always like what I make.

Okay - I am super sorry for the horrid quality of the photos, seriously, you wouldn't believe that I was working as a studio photographer in Singapore at one stage, I have become so sloppy with photo taking. It is so cold now, in the negatives and I took this inside. It also gets dark before 5 pm so I was too lazy to get the tripod out. 

I scored big time at the thrift store this weekend, I found a vintage Coach handbag (will post about it later) two pairs of shoes and this is one of them. A pair of black oxfords, making it my third pair of oxfords. (will blog about that later when the sun comes out and I can take better photos)


I lightened the photo a lot more so that I could show you dear readers what a boo boo I made. I used one of my old white t-shirts underneath and as I moved, the upper most ruffle would sometimes move up and reveal the white underneath. I also was lazy about using matching thread. I was just impatient to sew! But I just had to take a photo to say that  I made a skirt. Then I took it apart and ripped it all up and made it into another t-shirt scarf! I had made it too tight and as I went to wear it, I could hear the thread rip, as the ruffles gathered the t-shirt material closer and made it tighter.

Cost of fabric - $2.75. I used two t-shirts and I stole my husband's old underwear's elastic for the waist band.
Shoes: Thrifted black oxfords $9
Socks: TJ Maxx a pack of 3 for $6 and top, my own from Target. (old)

Saturday, November 26, 2011

Inspired By Pinterest: Recycled Scarf

 I saw this wonderful tutorial on how to make a scarf out of an old T-shirt, I was just itching to have a go at this project. It is better to get the largest t-shirt you can find so that you will have more rings. More rings = longer scarf = more warmth.  I apologise for the grainy quality of the pictures here, I am using my old iPhone 3GS in a night time setting. Here is a new with tag shirt I picked up from a thrift store. If it weren't a size M, I would have been tempted to keep it!


I cut it in 1 inch strips.


Laid them all out on the table:

Tied them together and it was a fairly long scarf.

I like to wear my scarf pretty tight because I want to keep warm. Excuse the miserable rag of a dish towel in the background.

Pretty pleased with how quick it is to make this. I will make another two more - this time I will try to do them in tighter circles.

Monday, November 21, 2011

Australian Table At International Night

The boys school held an International Night on Friday. My husband was the main star of the table because he dressed as Crocodile Hunter. I wanted to make a plush crocodile to drape around his shoulder but time got away from me and we ended up with a wooden crocodile.


This is his outfit. I was in stitches when I saw him. Nevermind that the weather outside was 1 deg C when he wore that!

Matt is a great baker and cook. He made Honey Joys and Anzac biscuits, which are Australian treats.


We had kids running back to our table repeatedly to grab more of our honey joys. They went fairly quickly! Surprisingly, the Vegemite was quite well received. I thought there would be people spitting them out but most were very polite and saying it was nice!

So here is our space, our boys did a great job telling people about Australia. I wanted to do this for my oldest, since he would be at the school for another year and a half and I wanted him to have good memories of participating. We also had an activity area where kids were painting aboriginal art using chopsticks. It got pretty messy but I was so thrilled that they had fun.

Children had to visit each table and get a stamp on their passport but Matt wouldn't stamp on theirs until they said "G'day mate!" It was very funny to hear even the parents attempting this.

There were 25 other nationalities there, from Nepal to Russia to Cambodia. DC is a very diverse area indeed. I was unable to see much because I was looking after the table. Oh yes, I was dressed as a "Bogan" (redneck) with my Australian Ugg Boots and flannel shirt.

Inspired By Pinterest: Leg Warmers

There is a neat tutorial on Pinterest - see this link here and I got all excited about creating my own leg warmers. So last week, I picked up a couple of sweaters from the thrift store and brought them home. However, I found it really hard to cut away the sleeves just for this project. It just felt like I was "wasting" a perfectly good sweater to put on my legs. In the end, I chose one that I didn't feel so bad about cutting up, because it was too big on me.


Can you see a reflection of my 10 year old in this picture? He is so sweet, taking my photos for me. I wasn't thinking about "styling" my look when I took this photo and my sweater is way too short with a pair of leggings.  I was just excited about the end product. I thought it would be fun to choose one that was colourful since everything is so gray and dreary in winter. This picture was taken before it got really cold.  It went from top of 17 C on Wednesday to suddenly top of 7 C. We were suddenly facing temperatures of negative 2 C in the mornings. Half our household is sick (myself included) from the weather.

Cost of project: $5 for the sweater. I can use the extra materials to make a sweater skirt later. 

Monday, November 14, 2011

Pinterest Inspiration: Bright Blue Jeans

Went thrift store shopping last week and picked up a number of clothes but the one I am blogging about today is the electric blue jeans I found. I couldn't believe my eyes when I saw it. The tags were still there and it was brand new. It is from Delia's - another store aimed at the teens but that's good for me because it meant that it was small! It was a bit loose around the waist but nothing a belt couldn't hold up and it needs taking up at the hem. $7 ka-ching!

One thing I have learned through taking my own photos and blogging, is that I don't realize how awful I look until I put it on the screen.  I have always been a shorts and t-shirt kind of gal, having lived in the tropics for so long, it was just uncomfortable to have anything that was to clingy or that was not cotton. I hated wearing accessories because the sweat would just stick on to your necklaces or bracelets and it would just turn yellow with the stains over time. Ick!  When I moved here, I was suddenly confronted with so many choices, fabrics, layers. I have been learning a lot just by looking at Pinterest.

Last week, I wore it out to the mall and realized after that I took this photo the jacket was too short overall. I look short! The flats don't help either.


So I tried another jacket/coat. I have this fabulous Ted Baker trench coat I bought back on a 50% sale when I flew into NY from Singapore for a shopping weekend with my cousin in 2009.   He is a splurger, as opposed to me, a thrifter so you can imagine what the outcome was like! I ended up buying something I didn't use.


 I am not sure if I like this put together. I changed out my flats to wearing something with a little heel.


I like the inside of the coat because it is lined with the softest of silk and it is like a painting, with streaks of colours!

Hmm...I don't know. It's a work in progress. Which works better? I would like to know if any of you have been inspired by Pinterest like I have, and tried to put clothes together that you never would have tried. Do share your link as I would love to see what you have come up with!

Wednesday, November 9, 2011

Union Jack Beds

Finally! I put them up on Craigslist today!


I pulled them into my study, dragged away all my other furniture because I wanted to take it in good lighting. What would have been perfect is that I put mattresses on them and "dress" the bed up but I cannot imagine dragging the heavy mattresses from the boys' rooms and then lugging them up again. I hope it sells! The link is here.

I will be linking this up on Miss Mustard Seed's Furniture Feature Friday!

Sunday, November 6, 2011

Pinterest Inspiration: Fur

I am a major hoarder. I keep so much stuff that I am surprised that there was room for my family when we lived in a little apartment of under 1000 sq feet in Singapore. So when we moved here, my husband thought there would be more room for my junk, but no! Gleefully, I acquired more stuff. Oh well!

But this fall, I am so glad that I hoard because back in the 1990s when I lived in Australia, I took up some sewing lessons and made myself a fur coat out of teddy bear faux fur. I never completed this fur coat and when we moved halfway across the world to the Middle East where temperatures are above 100 F or a constant 40 deg Celcius, I could not bear to throw it away because of all the work I put into it. (Mind you, I even have clothes from my high school days, and I am thankful that my body has not changed much over the years)

Fur has come back this fall with a vengeance! Happily, I was able to dig out my trusty old fur coat, which I have never worn by the way.  We have lived in the US for the last 2 years and I never wore it because I never knew what to wear it with! Pinterest is a great way to learn how to put things together, and I spotted this recently.

Image from Frugal-Fashionistas.com - a really neat website, go check it out!

This is my take on it.

The temperatures have certainly dropped over the last 2 weeks. Last night it was close to 5 - 6 deg C when we went out to dinner. We had snow last weekend and the days are getting shorter. The leaves are starting to fall from our trees. Aren't they pretty?


So here is where I have not completed the coat - I have not hemmed up the sleeves nor the length of the coat so when I stick my hands down the pockets, you can see the lining of the pockets sticking out from the bottom of my coat. Ugly!

And there are only three buttons. I have no idea why I stopped at three but I remember that I had to hammer it down pretty hard, using a real hammer, no less.Yes and I kept ALL my notions with me, through the Middle East, Singapore and now here!


This was my second big sewing project, I had a good sewing teacher. For those of you who live in Melbourne, Australia, Dragana Edwards is the lady to go to! She teaches you how to draft your own patterns and you are not a slave to buying patterns!

Time to get to completing this fur coat before I have to wait another 20 years for it to come back in fashion!

My coat made to my specifications: AUD$80 or less for materials,  more than 20 years ago!
My Hilfiger jeans: old pair, sale from Macy's $40
Grey long sleeve top: Cherokee, bought from Duty Free Shop in Malaysia for RM20, 3 years ago
Boots: Ann Klein leather, sale from 6pm.com $49 but I had this for over a year now.