Friday, October 29, 2010

My Chair

I have been slow in crafting for a long time. Since moving here, I find that I have less time to myself to do any crafting because I am spending more time cooking and cleaning, and driving my kids to and from school.

However, one indulgence that I have is re-upholstery classes and I never imagined that it would be so much physical work! To read more about the chair see here.

From this wonderful thrift store find, I am converting it to this:

It is still a work in progress but it has taken such a long time. I cannot count the times I have stabbed myself, stapled gun my fingers and tried not to bleed over my chair.

Here are some in between photos - I don't know if I can remember all of the steps but I hope to tackle another chair soon.  Well, as soon as I finish painting my walls, repaint some of my furniture and so on and so forth.  Think I will ever do another chair? I hope so!

I did not know that people used horse hair or hogs hair to stuff a chair. Apparently the really good quality chairs use horse hair whereas some other places like Asia use coconut husk. I just re-used the horse hair that was already in my chair.  I was a tiny bit grossed out by handling old horse hair. It just felt very coarse and reminded me of pubic hair.


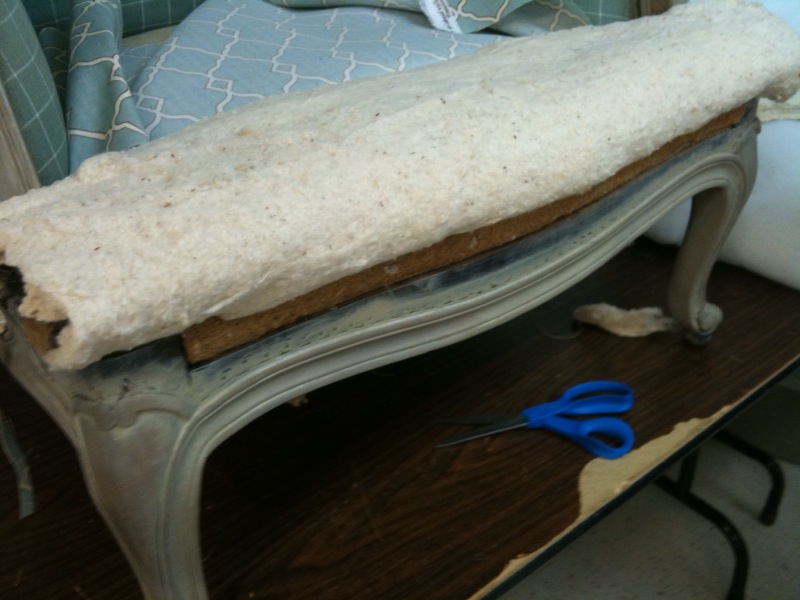
Then cotton is placed on top of the horse hair before placing and stapling the fabric onto the chair.


Here is a picture that James took of me using my heavy duty nail gun in the family room.

I hope to finish this chair this weekend!

Tuesday, October 19, 2010

Pelmets

Through the decorator I went with, I ordered some fabric to go over the pelmets in my family room. At that time she warned me that the fabric was expensive and I thought, "How expensive can they be? $35 per yard?" I was a bit embarrassed to keep asking how much everything was and I like to thrift because I know that there are cheaper alternatives out there. But you don't hire a decorator and turn cheap on her, like my friend Revathi mentioned. She had a point.

Turns out, this fabric is US$115 per yard. I nearly fainted when I saw the invoice but as most of our stuff was selected based on that fabric, there was no turning back. Luckily I only needed 2 yards. It is fabric by Schumacher and it was printed in Thailand! All good things come from Thailand, like Jim Thompson. I love it though.


I thought do the valences myself since there were already valences in the house with a very country-ish fabric on them that suited the previous owner's furniture.


Ignore the mirror sitting on the floor, I still have to figure out how to hang that because it is darn heavy and the last thing I want is for it to come crashing down in the middle of the night.


This is what it was like before. I tore the trimming out and using the nail gun, I nailed the new fabric over it. Easy peasy!


Heart attack moment: I cut the first piece and realized that I had the WRONG measurements! OUCH OUCH OUCH! That was a $76 mistake. Hmm...I hope I can re-use the fabric for cushions. On second thoughts, I hope I have enough fabric for the other valence!

Sunday, October 3, 2010

Repainting My Walls

We hired a decorator from out of state, (as she was the only one whom I knew) and she came to our house and gave us some ideas on how to make our place more relevant to us and one of the things she suggested was to paint the breakfast nook a black and white stripe to make it stand out.

So I got myself some paint and there are soooo many types of paint to choose from. I went with a satin sheen and realised too late that it is probably not very good if the walls are uneven. You can see almost every bump on the wall!

Anyway, I cannot be bothered repainting the whole wall. I just hope that it is not too noticeable when people come to the house.

So this are the before and after pictures. Please note that this is still a work in progress because the lines bled into the tape so I have to do a re-touching up!

Okay, this is not a very glam shot of me but let us focus on the wall eh? This is what the wall looks like after I primed it.


 After painting it white, I drew lines across, using a leveller and a ruler.


Then I taped it with painter's tape. I was told to use the Frog tape, which is very good for painting but I thought, "All tapes are the same!" What a mistake I made!

Here, I painted the black on the white.

After two coats of paint, I removed the tape and ta-daa! I am pleased with the effect. However, there is some bleeding and I will need to go back with a fine brush to fix it! Bah!

Next, I got rid of that hideous fan and repainted the wall adjacent to it because it is in some brownish colour.  Sorry about the mess, I am in the midst of painting the other wall.


What do you think?