Thursday, January 27, 2011

Finding Out The History Of Your Thrift Purchase

Last year, Apartment Therapy featured a Union Jack dresser on their Craiglist Scavenger List. I saw it and knew I had to have it immediately. Heart pounding, I wrote to the seller and she responded to me very quickly. I cannot remember the rest of the story but we were quick to see it and we bought it on the spot. The lady, Meranda, who sold it to us is a lovely person and we have emailed each other a few times after that. She helped me with achieving the Wisteria-like finish to the Wingback chair I upholstered. I also found that she had moved to Seattle, which was sad. I think I would have liked to get to know her better as not many people I know personally enjoy painting furniture like she does. Meranda also is very generous with her knowledge and goes into great detail on how to achieve a certain look.  She has a blog but it does not seem to be active anymore. However, I still go back to it to refer to her painting techniques as they are very detailed and helpful.


I read other people's blogs too (about 120 of them, can you believe?) and there is a very talented lady, Marian from  Miss Mustard Seed whose blog I follow. She also lives in Maryland! One day, she painted this lovely Union Jack dresser and a part of me wanted it. Matt was firmly against it, he wanted to know, why do you need two? He's right of course, but I just love the impact of a Union Jack design in a room and I covet them all!

I read the comments of  Miss Mustard Seed's followers and one of them linked another post to it, talking about another British dresser. I looked closely and thought, hang on! It was MY British dresser they were talking about, but I did not recognise the website. I discovered Meranda had another blog dedicated to French provincial furniture. There was a link to how she painted my dresser and again, wonderful details of how she achieved the finish. It was so nice to be able to read about the whole process and to know that that dresser is sitting in my boys' room. I was about to put a layer of polycrylic  to protect the paint from the boys' rough handling but I did not know if she had used latex or oil paints. There was a warning on the label of the polycrylic - that it would yellow oil based paints. I couldn't email her anymore as I had lost her email and she had moved. Her blog was no longer active. Reading about the dresser helped me to discover that she used oil based paint and I am so glad I did not slap on the polycrylic now!

More On Campaign Furniture

What timing! Another blogger wrote about his campaign furniture a day after I put my post up. You can read about it here! He is a big time thrifter and I love reading his blog to see what valuables he finds at good prices.

Wednesday, January 26, 2011

The Campaign That Got Away

Last Saturday, I begged Matt to drive me and the boys to ReHabitat, a place where people dump their unwanted furniture and cabinetry from their kitchens. You name it, they have it. Lighting, sinks, bathtubs, tiles, old tools. The money goes back the charity build homes for the poor all over the USA.

When we were there, I spotted an antique desk which took me all of 10 minutes to snap up and buy it straight away. I knew it was going into the boys' room. I will take a picture of it in the morning.

Anyway, I digress. I had a quick walk through the whole store and saw this beauty.

Yes, it was a knockoff Campaign dresser! It came with a hutch, all for $50! What a rare find! It was a laminate but with some primer and paint, I could transform it and sell it. They are very popular as Campaign furniture was used by the British military in the World War. If you do an Ebay search for Campaign furniture, you see that some of them run in the thousands of dollars.


One of my favourite designers from LA, Vanessa De Vargas of Turquoise repainted her dresser in this eye catching green. Her dresser is so famous that it has made the rounds into so many international decor magazines, all the way to Australia.


Other bloggers have also transformed their campaign furniture. I saw this on another blog and save the picture but I cannot remember where I saw it to give the blogger credit.


So on Tuesday, I went back to the store to see if I could pick it up. I opened all the drawers and one of them was stuck. The bottom part of the drawer that formed the slider was damaged. Could I fix it? It was beyond my current capabilities. Not only that, I have a million other projects to do right now and although painting furniture is quick, fixing a slider requires a contractor to do it and that would raise my costs if I thought of selling it. In the end, I had to let my head rule and walked away from buying it.


Thursday, January 20, 2011

I Have Been Busy!

Firstly, let me say that the spacing and paragraphing in blogger has gone bonkers because I don't know how to control it, and there are big gaps in between photos and paragraphs. I have tried to adjust it as much as possible but to no avail. Please put up with my amateurish attempts at maintaining a good looking blog. :P

I have not been blogging because I have been trying to put the boys' bedroom together and I wish now that I took photos of the process. I did take some but I left out some others. Oh well.

First there were the beds. You have seen them already but just in case, click here. The beds had scratches, and some of the veneer had come off. 


I sanded both beds down as much as I could. I used my Dewalt orbital sander as much as I could but the spindles were done by hand.  At first, I sanded in the basement but the sawdust went everywhere and we have our freezer in there. So I took it up to the garage but try working in there when the temperatures are below 0 degrees!  I have to say that I did not give the bed the sort of attention that I would normally give to my other projects because I wanted to get back into the warmth!


Here is the bed, primed in grey primer. (BTW, is it spelt "grey" or "gray"?) Notice the cute little loveseat it is leaning on? I found it on the side of the road, someone threw it out but the springs are very good, even better than the seat I reupholstered! I am waiting to be inspired, in other words, waiting for the right fabric to get me all excited. So it sits in the garage, holding up our other junk!


The painting part was such a nightmare! I have painted wood many times before but that was in Australia, under different climate conditions, using different paint. I started with spray paint and to my dismay, I noticed around the spindles, it dried with a bubbling texture! I sanded it down and did it again. Still the same! I did this about 5 times, I swear! I did a search on the internet and suspected that it was too cold which was why the paint was not drying properly. There was no way I was going to wait till summer! So, I brought it into the house but our house is quite cold too as the heater does not seem to be working downstairs. Still it was crinkling. Matt said he could not see them unless he got really close. Here they are, drying in our family room, near the fire place.


The perfectionista in me decided to sand it all down again and I chose to use regular satin paint - you know, just paint with a brush. That worked very well! I have learnt an important lesson, spray paint does not work so well in winter!
The beds were all set and then I knocked into the headboard while carrying it somewhere and some paint chipped off. I realised that the boys would likely knock the bed a bit so I thought I'd protect it with a layer of clear Polycrylic. Big mistake.

I have also learnt that with Polycrylic, you need to work in a dust free area. Specks of dust and dirt were showing up as spots all over my bed and the shiny look on it made it look cheap. I thought, okay, maybe it needs a second coat, as the directions said to coat furniture three times. Made no difference.

Back to sanding, and repainting again. Not as good as the first time because by this time, I am so sick of doing this bed!  Matt knocks it with his metal watch and paint comes off. I just slap on the area some paint. Who cares already? :)

Okay, brace yourselves for the boys' room. They have a lot of junk! They have both started collecting stuff and I have no idea where to store them. By junk, I mean things like rocks. Hundreds of them. Empty Tic Tac bottles. Bakugans. Empty candy containers. There are others, I don't even know what to describe them. Sometimes when they are at school, I throw out their things because their room is beginning to look like one of the episodes you see in "The Hoarder." Now most of their junk sits in the guest room, waiting for me to sort them out!


They did not have proper beds to sleep on, they used trundle beds, which worked well because they are really into doing forward rolls on their beds right now.

 
See the purple colour? It was great when two girls used to live in this room. I chose the colour Jubilee No 6248 from Sherwin Williams. I had test painted six other colours on the wall but didn't like them. So when I read this post on Apartment Therapy, I told Matt, "This is the colour!"

Hmm, why is the picture so small?
There is an amazing story I will tell you one day about how they mix paint in stores all over the USA but I was save it for later or this post will never end!

It looks more blue in the photos but when you are in the room, it is actually a shade of gray.
 

Initially, we put the British Union Jack dresser in between the two beds, as inspired by this picture.

However, the dresser was wider than I thought (because I don't measure!) and one of the bed would come very close to the entrance to the room. When you opened the door, it would hit the foot of the bed. Drat! Plus, it did not look right. So now, I will just leave it where it is, ignore the brown dresser in the room, it will go to the guest room. I am trying to find a little Danish mid century open bookshelf to go between the beds, like the one below. I saw this beautiful piece on Etsy but I don't have the budget for the boys' room. It is also a lot wider than what I had in mind, what would be perfect is just half of that, just perfect for the gap that it is showing in the picture now.
The wood slats you see are in different colours because the original beds only had three planks each and we wanted to give the boys more support, especially when they do their gymnastics on the bed. I got pine wood from Home Depot, came back and cut it on my mitre saw. I let the boys have a go at it too and they were very scared at first but I want them to start young!
 
I know that I will never make a good interior designer because I did not choose the fabrics/bedding/art to match the paint and now I am stuck with options for curtains/blinds.  I will have to work backwards! But I do it with a happy heart because it has been a really enjoyable process. Come along with me and we will see how this room turns out!

My Chair

Yesterday I worked on the cushion of my chair and my teacher taught me a short cut in making a box cushion. It is a very clever way to do it, and I will try to make a tutorial on how to do it his way. He says it is the way upholsterers use because they do not have time to pin three different layers, with piping etc. However, in doing it his way, my sewing was all crooked and the end result is a very unsatisfactory seat for the chair! I am not a good sewer and no doubt those who are proficient with the sewing machine will find it easy with a short cut method!

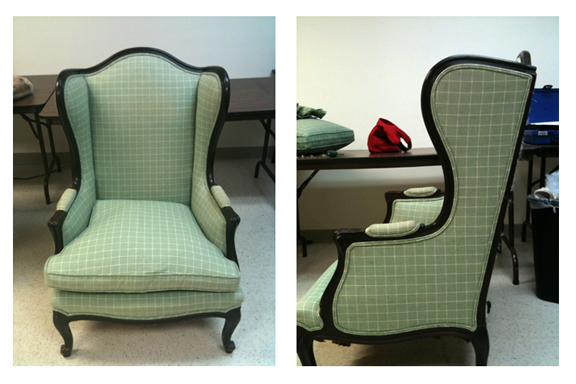
Here is the almost finished chair. I still have to do a double cording around the arms, chairs - notice where the brown cardboard is? I am going to hot glue the cords to it when I am done. I also do not like the finish of the wood - it seems too pale and blends in with the colour of the fabric. I think I should have chosen a fabric that was more of a contrast with the wood.

Here it was what it was like before:

This is it now:


  What do you think? Should I darken the wood?

Wednesday, January 12, 2011

Looking For This Desk

...for the boys' room. I have looked in Craigslist, Ebay and thrift stores. Still looking for something similar and not willing to pay more than $200-$300 for it. Love the wall paper and the cushions!

Image taken from House Beautiful, designed by Daniel Sachs.


Discount Magazines

I love shopping on the internet, in the US sometimes it is cheaper to buy it online than from the stores. Take our toilets, for instance. We went to the shop that sold Toto toilets and as much as we wanted to support the local business, we were to be charged about $1,500 for three toilets. We ordered everthing online and it was under $1,000 with free shipping. Not only that, it arrived in 4 days' time, whereas the local shop said they had to place a special order in for the toilets.

Anyway, I subscribe to many magazines and I have always wanted to subscribe to the Architecture's Digest magazine. If I subscribed the normal way, which is contacting them directly, or via Amazon or some merchant, it would cost me a yearly fee of $59. There are these discount places that have daily deals going on. I am happy to say that I was able to subscribe to the magazine for $5.99 per year, inclusive of shipping!

This is probably nothing new for most Americans but for me, coming from a place where deep discounts are not the norm, this is like scoring big! So much so that I have to blog about it! :)

Here is the price before discount:


After clicking in a coupon code, the price is $5.99! SWEET!