Sunday, January 9, 2011

Thrift Store Finds

I went to the thrift store with Matt on the same day we went to Michael's. The Goodwill in this area sometimes has some really wonderful antiques but most of the time, I walk away without buying much. However, this time, I spied something so wonderful and rare, I could not resist taking a photo of it.

It is a piano made in the 1800s and it was in pristine condition! I happened to see a similar piano like this during one of the field trips to a historical house where George Washington used to visit but I was astounded that this was just sitting in the thrift store, thrown away by a family!

At first glance, it looks like an ordinary antique dining table with exceptionally thick sides. The little white thing on top of the piano was a sticker which said, "SOLD." Look at it here, the wood still in good condition, hardly any scratches or blemishes on it.

 When you open it, voila, there is a "hidden" piano inside! Totally beautiful and so rare! I would not have bought it because it was so chunky but someone had obviously seen its value and bought  it for $3500  What a bargain for a beauty!

What lovely legs it had!

There were also other goodies there and all furniture was on 50% off that day. There was a Jenny Lind bed there priced at $23 and after the discount, it would have been about $13 after tax! A good spray paint job would have modernized it like a fellow blogger did below. I did not take a picture because the bed was not assembled, it had been taken apart and leaned against the wall. Here is an example taken from Google.


 However, I stopped when I saw a pair of orange chairs. They were so ugly but the architecture of the legs and arms were begging for a reupholstery job. My other chair is on its final stages of finishing, I have stopped because my teacher went back to Australia for a holiday but I started again yesterday. A light went off in my mind as I considered the possibilities. Each of the chairs cost $55.00 and after 50% that would make them both $55.00. However, one of them was very shaky as there was something wrong with the legs so I just took one. The cashier looked asked me if I wanted to take 2 but I told him the problem. He said he would give me a discount and priced the chair at $15. I said I would take it at $10. He said, "SOLD!" I did an inner leap of happiness! I love a good haggle! Both chairs cost me $37 after tax, which brings it down to about $18 each. Still expensive for a thrift find but hey, we live in the DC area and thrift stores are more expensive up here!

So here was my very unusual birthday gift from Matt!

I know...I have a bit of this feeling of, "What were you thinking of!?" but I had a vision of this:


I know, it's not quite the same sort of shape but I will have a lot of fun making up my own fabric (I intend to make it myself as you can't really use the same material as the flag to upholster, it is not strong) and I hope to sell it after I am done with it! Very excited about those chairs!

A great day of interesting bits and pieces!


Visiting Michael's

There are a couple of large craft shops in the USA and I had to go get some gesso for some art work that I am painting (I will blog about that later) to prime the canvas so Matt took me to Michaels.We did several things on Friday - which will have its own separate post - but I am so lucky to have such a husband who enjoys going to places like these with me and is so patient to drive me everywhere I want to go as I am not a confident driver yet.

Michaels' is HUGE.  It looks like a huge warehouse with lots of goodies inside. It would be my idea of heaven!


Rows and rows of things to inspire your creativity! There were cupcake making sections, cake making, decoupage, art supplies, clay making, candle making, punchcrafting, scrapbooking. There were loads of fake plants too which I didn't take any photos of.

Seriously, why would I want to leave the USA? :)

Wednesday, December 22, 2010

I Love Home Goods

Home Goods is a must visit if you ever come to the USA. It is a place for home decoration goods - ranging from things in the kitchen, furniture to the garden - anything you could imagine that fits into the home. What is so special about it is that high end shops discard their excess stock and sell it to HG and they sell it to us at deeply discounted prices. There are lots of goodies from Ralph Lauren in sheets, pillows, Tommy Hilfiger, high end stuff at 60% off.

The thing about Home Goods is once you see something you like, buy it immediately because if you let it go, chances are you will never see it again. There is always a 30 day refund if you change your mind but at least, it gives you time to think about your purchase.

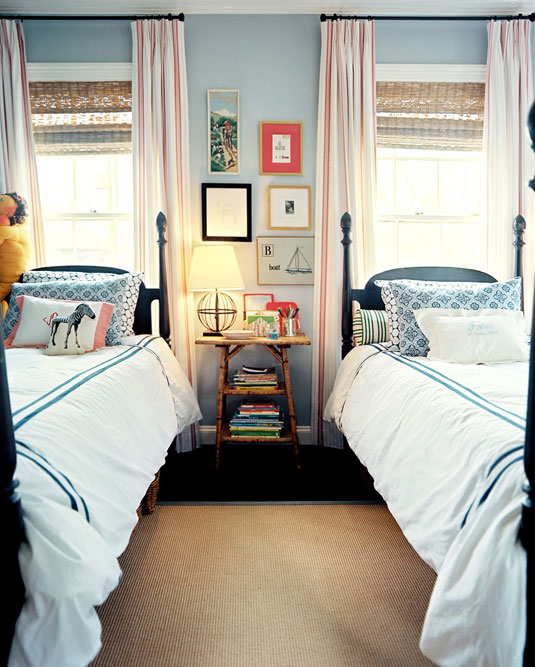
I am putting the boys' room together and found something that I think will go well in their room. The letter J. This is made of solid wood and is very heavy.  It needs a paint job and a makeover to fit what I have in mind for their room. Now I just need a C.  It is so fun finding pieces that will all go into putting a room together!


The other thing I bought was this fun kitchen clock. We do not have a clock in the house because clocks are such boring things. The ones I like are usually too expensive so when I saw this clock, I knew I had to have it. I am thinking of painting the red utensils stainless steel colour to tone it down a little but would need to find if I can find a "steel" colour. It cost me $19.00


There is a delightful story of a mother who decorated her daughters room with a budget of $250. This story was featured on the very popular design blog which I read daily, Apartment Therapy.  What I loved about their room were the two sunburst mirrors and the lucite chair.


The mirrors came from Home Goods for $25 each and others asked where they could buy it - the closest match they could find was $500 each! Her story is a real inspiration that you can make a room so gorgeous and not have to break the bank.

Saturday, December 18, 2010

Gingerbread Christmas Ornament

I have not been creating very much these days, as I have so many projects on at the same time that I don't get to complete anything. Ever been through that feeling?

However, there was a quick project that I was able to do and that was Elsie Marley' very cute half eaten gingerbread man. You can see her tutorial here.

I made a few of these to give them to friends from my care group. I had the lighter colour felt and worked with that initially and later went to Joann Fabrics to get the darker browns. I am not sure which one I prefer. My son, Cameron likes the darker one because it reminds him of chocolate!


It was a very fun project to complete and I think they are hilarious! Go to Elsie Marley's blog to check out her other cool tutorials!

Sunday, December 12, 2010

Antique Quilt

During one of Cameron's school field trips, we went to a manor where a rich family used to reside. The house was built in the 1700s and they were personal friends with George Washington.

Everything in the house was retained to be the same as it was in the 1700s and we got to eat and watch how food was cooked over a fireplace.

We also got to see a real log cabin. It reminded me very much of Little House On The Prairie.

However, the one thing that caught my eye was a quilt hanging on the wall of the house.

Sorry for the blurry pictures, I did not have my camera with me that day so I had to settle for my iphone.
Isn't it lovely? I love old quilts and I wonder about the ladies who made them.

Monday, December 6, 2010

James' Bed

I have been working on the boys' room and want to give them one that is not too "theme related" and something that would only last until their teen years.  What I mean by that is that if I had done it like train room or shark room, by the time they hit their teens, it will not be very cool any more. I was looking for something more grown up.

I saw this bed in the Lonny Magazine and was inspired.


I saw  these beds on Craiglist advertised for $100 each, I managed to bargain them down to $75. It is solid, made of maple wood veneer but it is ripped up and has marks in several places. I thought about restoring it to its original state but that is beyond me because some of the surfaces has gone below the veneer.


So I sanded them down and primed them over the weekend. However, when I went to paint them, I noticed the paint was wrinkling!!! I had to re-sand and repaint 3 times and thought it was because of the cold that the paint was not sticking. After all, the can did say, "Spray when temperatures are 50 deg F."  It was 32 F.

Then, I took the beds inside, lined the floor with a drop sheet and in front of the fireplace, spray painted the bed again. Did not help at all.


This is what the bed looks like, primed with gray primer. I actually like the colour of the primer more than the actual colour itself!

Now, I am beginning to wonder if it is due to the fact that I did not sand the whole bed. I could only sand the flat parts of the bed but found it hard to sand the spindle. I have to sand off the paint and reapply primer again to the bed. I also used latex based primer, which is a change from the oil based primer I used to work with. Oil based primer is an excellent primer for working with wood, you don't even have to sand the furniture to get the paint to stick on it but it is a pain to clean and very toxic.

Wow, this is hard work. I don't like working in the winter. The garage is so cold and what I really need is a well ventilated, heated work space.  Hint for Christmas, Matt!

Building A Desk

I go to Ana White's blog and she is a real inspiration to about a million women. She has inspired me to buy tools and make a desk for my study because at the moment, it is a right mess. We are too cheap to buy a desk so Matt suggested I make one!

We ordered an air compressor and it came with a brad nailer/stapler gun. It was a Black Friday deal, reduced from $199 to $59, free shipping to our house.


So when it got here, I started working. Matt helped with the instructions on how to run the machine. He tried to give it a go but he ended up putting holes in the wrong spots and eventually went inside to help Cameron with the cooking!

It was a lot easier than expected but as I went along, I learnt many things, that we use drywall screws to put MDF wood together, as compared to regular nails for plywood. Ana is a great teacher, she gives such details that you can follow her instructions easily. 

Working with wood reminds me of quilting. It has the same sort of precision, measurement, mathematics. Just different tools. When I mentioned this to a group of men in the woodworking class I did last year, they did not seem very impressed and my comment was received with grunts.


It was bloody freezing in the garage that day, below 0 degrees. I tried working with gloves but I found I could not pick up screws with them on, so I took them off. My fingers were numb at the end of it! But oh, it was so rewarding to see the little drawer base completed. I just have to sand it and finish it.The patches of cream is where Matt accidentally drilled holes into and realised they were in the wrong spot. No harm done, everything is fixable with wood filler, a sanding and a coat of paint.